Tuesday 31 December 2013

Top 5 pieces of technology from 2013

Ok so I thought that as 2013 is almost at its end I would bring to you my top five new pieces of technology that have come from 2013. These are the five that have interested me the most and that I think will revolutionise their respective industry in some way. These five pieces of technology are in no specific order.

First up is Google Glass. While Glass is not commercially available yet it has been available to a few lucky thousand people who were invited and then paid a small fee of $1500 to have the privilege of getting the explorer edition of glass and basically being beta testers. For those of you do not know Google Glass is a wearable hands free smart phone, that you use your voice to control mainly and you wear like a pair of glasses. If you want to find out more about Google Glass and how it works I suggest you visit the wikipedia page for Glass here:
http://en.wikipedia.org/wiki/Google_Glass
I think that Glass deserves a place of my top 5 because it is completely revolutionising the industry. Wearable technology really hit the scene in 2013 and is becoming more and more relevant with many big name companies making smart watches such as Samsung and Sony but Google has taken it one step further with Glass, as they like to do, and they have effectively made a computer that you wear as glasses. I hope that this will encourage development from other companies to try and compete with Google Glass and come up with other interesting pieces of wearable technology. Unfortunately there has been some controversy surrounding Google Glass because of the way that you could take photos and videos of people without them releasing. Google have tried to sort this out by releasing some information to the public which tells you how to be able recognise when people are recording or taking a photo. Google Glass is going to be commercially available at some point in 2014, there has been no official release date as far as I am aware.


What many of us dreamed about as kids is finally coming to reality for us now with the Oculus Rift, a virtual reality head mounted display. It allows people to play games with the head mounted display on, allowing for a true surround gaming experience. Although at the moment there is not a huge amount of games available for it due to games having to be specifically designed to work with it, more and more are becoming available as Oculus is creating a software development kit to help developers integrate their games with the Oculus Rift. While the Oculus Rift alone is very exciting I think add-ons to it such as the Virtuix Omni are more exciting. The Virtuix Omni is an omnidirectional treadmill and it works as a game controller with the Oculus Rift. This basically means that when you walk on the Omni then your character in game will walk, and when you run your character will run. I personally think that this is a great idea as it allows gamers to finally get some exercise while playing games. If you could get other add-ons such as guns, this would make games such as Call of Duty so much more exciting in my opinion and it would really enhance the game play experience. For reasons such as the Virtuix Omni is why I have included the Oculus Rift in my top five pieces of technology in 2013, because they are so innovative in the field of gaming and I feel that there has not really been enough innovation in this field for a long time,

Next up on my list is the Pebble Smart Watch. For me, this was the Smart Watch that really kicked it all off for smart watches. It was crowd-funded and is still the most highly crowd-funded project. The Pebble Smart Watch allows you to view text messages, e-mails, see who is calling you, and many other things on Android and iOS devices. There are also many different apps for the Pebble which allow you do more things on it such as music control and things do with fitness. This was the first smart watch that I heard about and so for me it was the one that has revolutionised the wearable technology market, along with Glass, and I think that this is where smartphones are heading, more wearable technology. The reason that it is my list not only because it was the first smart watch that sort of went viral, but because I think that it is still the best smart watch out there.

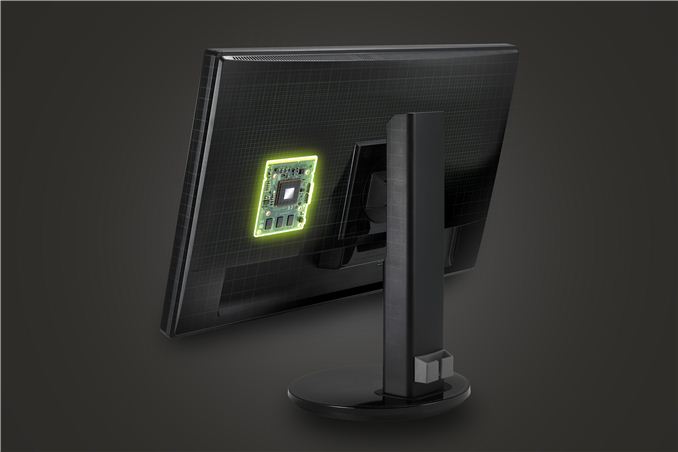
The penultimate item on my list is Nvidia's G-Sync. For those of you who are not PC enthusiasts you will probably not have heard of this and for those of you who are, you will probably have had the debate at some point between AMD's Mantle and Nvidia's G-sync. I personally think that G-sync is more important and with the first monitor being released with G-Sync now and AMD failing to deliver the first edition of Mantle in Battlefield 4 before there dead line of the end of 2013, I cannot include Mantle anyway. For those of you who do not know G-Sync is a small module that is attached to the back of monitors that helps with issue like screen tearing and skipping issues. From what I understand there was already V-Sync which helped with this issue but it also created a another issue which was input lag but because of the way G-Sync has been made, there is no input lag. Now I think that this is more important than Mantle because it affects every game were as Mantle will affect games where the game developers have bothered to add the Mantle API into the game and we have no evidence to tell us what kind of performance increases we are going to get from it; on the other hand G-Sync does not require developer support and although only a small amount of people have seen it so far, unfortunately I have not, the people who have seen it say that it makes it large difference. The downside is that you will have to buy a monitor that has the G-Sync built in which will be quite expensive. There is much debate over which will be more important and I will leave it to you to research and develop your own opinion on the matter but I think that G-Sync is one of the best pieces of technology that we have seen in 2013.

My last one is another Nvidia product, and no I am not an Nvidia fan boy, and that is the Shield. The Nvidia Shield is a portable gaming device that runs Android and so allows you to play all of your favourite Android games with a controller, but this is not the best thing about Shield. The highlight of Shield for me is being able to stream PC games to your Shield, as long as you have GTX 650 or higher. This works by using Shield as a portable controller and display for a game played on the desktop and some more complicated things that I will not bother explaining. It uses WiFi to stream the game form your PC to your device and because of this you would have thought that there would be quite a bit of input lag, however there is not. Since it has come out the Shield has received numerous updates with the best one, in my opinion, being the ability to stream games from your PC to your TV at 1080p, but you will not be able to do that wirelessly, you will need to get an Ethernet cable to go through the Shields micro-usb. This is the reason that I think it deserves a space on my list. It is revolutionising mobile gaming by being a great device if you are out on the go and want to game but then it is gives you a great experience at home playing on PC games on your TV using the device.

Well there you have it, my top five devices that have come out of 2013. You may not agree with all of them and if you do not comment below or tweet at me and tell me why not at:
https://twitter.com/TechRandN

Sunday 29 December 2013

TRN's Weekly Review

So this is going to be my one consistent post (hopefully) that will be posted every Sunday and in it I will pick my top 5 news stories of the week. These stories may not be the biggest stories but they are the ones that interested me or made me laugh. Lets get this started.

The first story that I found interesting this week was "The Console Living Room". This is basically an internet archive of a lot of games from various consoles during the 70's and 80's. As someone who grew up in the Nineties I did not get a chance to play many of these games so for people like me it will be a good chance to play some of the classics; were as for older generations it will provide a very nostalgic feel.
There are currently games from five consoles, these are: The Atari 2600, The Atari 7800 ProSystem, The ColecoVision, The Magnavox Odyssey, and The Astrocade. The are many games for each console with some real classics in there such as Donkey Kong:

There is currently no sound in the games but there are plans to add sounds to the games. You have the choice to either download the games and run them in a emulator or run them in your web browser. I have only run them in my web browser and I have found them to be a bit buggy but when you get them running they are great fun.
If you want to try these games here visit here:
https://archive.org/details/consolelivingroom

The second story is slightly more serious. Alan Turing is considered a war hero and rightly so. He was one of the key code breakers in deciphering the the Enigma machine. Without his work we may have lost the war. He was also a pioneer in Computer Science and is widely considered to be the father of theoretical computer science. Alan Turing was homosexual and in 1952 he was convicted and was given probation provided that he underwent hormonal treatment. This treatment left Turing with erectile dysfunction. It also meant that he lost his security clearance and so could no longer continue his work with the government. This led him to commit suicide in 1954, his death was caused by cyanide poisoning.
This week Alan Turing was pardoned, however this was not greeted with the kind of response you would expect. Of course most people were very happy with the result but some believe that it was the wrong thing to do. They believe that if you are going to pardon Turing then you should have to pardon all the people who were convicted for homosexuality, not only the people who were war heroes. They are angry because it seems like he has pardoned because he was famous, not because he was homosexual and many people think that this is unfair. I can see where they are coming from.

Now for some more light hearted news, unless you live in China, Battlefield 4 has been banned in China. China has banned the game because the Chinese government believe it threatens the country's national security. The issue comes with the games DLC called "China Rising". This is set in 2020 and is about Admiral Chang trying to overthrow the Chinese government, he is then supported by Russia but this then starts a war between China and the USA. This is not much a problem though as the game was never actually officially released in China.


With CES looming over us there is some bad news for Windows. Apparently PC makers are planning a rebellion against Windows at CES according to Tim Bajarin of Creative Strategies. Bajarin has said that "PC Plus" is being worked on. This is a machine that will run Windows 8.1 and Android simultaneously and it will be done through software emulation. One of the reasons for doing this is to bring more touch based apps and games to Windows. This has been done because when Microsoft released Windows 8 it worked very well for touch screen computers or tablets running Windows, but worked poorly on traditional keyboard and mice devices which angered many people.

Amazon compensates for missed Christmas deliveries with gift cards
Finally while Amazon had a great success in terms of the number of sales of 426 items per second which totalled 36.8 million items ordered in total worldwide and gained more than 1 million new Amazon Prime members. However they did have trouble with shipping all of these items. The main problem lay with UPS and FedEx who could not deal with the increase of items needing to be shipped. This meant that many people did not receive gifts before Christmas. To try and rectify this issue Amazon are not giving all affected peeople $20 Amazon gift cards.

If you enjoyed make sure to share it on Twitter and Facebook and follow me on Twitter here:
https://twitter.com/TechRandN

Saturday 28 December 2013

How to Install CyanogenMod 11


Ok so after spending about four hours this afternoon trying to get CyanogenMod 11 to work I thought I would make a guide as I could not find a good, clear guide on the internet.
For this guide you will need to have unlocked your bootloader, rooted your phone, and installed a custom recovery. For this guide I will be using TWRP custom recovery, but it should the same for other custom recoveries.

I am going to do two guides in here, one for people who already have CyanogenMod installed, and ones who do not. I will start with the one for people who have not previously installed CyanogenMod on their phone.

1. Ok so the first thing you are going to want to do is download the latest CyanogenMod Nightly build. You can get the latest Nightly builds from the CyanogenMod website here:
http://download.cyanogenmod.org/
(make sure you pick the correct model for your phone)

2. You are going to want to download the latest version of Gapps; for those of you who do not know the people who make CyanogenMod are not allowed to give out downloads including google apps. You can download the latest version of gapps from here:
http://wiki.cyanogenmod.org/w/Gapps
Choose the "AFH" option for downloading it instead of the "Torrent" option as the "AFH" option will give you a zip file.

3. Once you have downloaded these two folders you are going to want to locate where you downloaded them, do not extract them. You now need to connect your device to your computer and get access to its internal storage, this should be found in My Computer. Now once you are in the internal storage of your device you are going to want to copy and paste the folders you have just downloaded into the root storage of your phone(do not put them into a folder). It should look like this:

(On mine you can see the zip file is an older version of CyanogenMod, I was just using this for demonstration purposes and I was using the other method to update)

4. The first thing you are going to want to do on your phone is back it up. I recommend you do this in your custom recovery. To do this you are going to need to be able to get into your boot loader. There are two ways to get into you're bootloader:

  • The first way is to reboot your phone and when it is turning back on hold down the the volume down button.
  • The second way (the easier way in my opinion) is to hold the volume down button, then the power button until your screen turns black. When it turns black release the power button but carry on holding the volume down button.
Now you are in the bootloader it should look like this:


As directed you the volume down button to navigate down until you are on the recovery selection and then press the power button to select it. It will then enter you in into your custom recovery. Click the backup option, select all of the options and swipe to Back Up.


5. Now you have backed up your device you are going to want to wipe your device. Go back to the home screen on your custom recovery and select Wipe. Click "Advanced Wipe" and then select Dalvik Cache, System, Cache and Data. Swipe to Wipe.

6: Now you can setup your ROM. To do this in your custom recovery select install. You should see a screen like this if you are using TWRP:

Scroll to the bottom and you will see your CyanogenMod download and gapps download:

Then click on the CyanogenMod download and swipe to Confirm Flash and then do the same with gapps.

You should now have CyanogenMod installed. Just reboot your phone and set it up.

Ok so this is the method if you already have a version of CyanogenMod installed.

1. If you already have CyanogenMod installed then you are going to want to go into Settings -> About Phone  -> CyanogenMod updates and make sure you have "New version (incl. Nightlies)" selected. When you have that selected it should come up with the latest Nightly builds that you can download, choose the latest one and let it download.

2. You are going to want to download gapps, from the same place as for the first tutorial, here:
and once again make sure you download from the AFH link instead of the torrent. This cannot be done with goomanager because it will not give you recent enough versions of gaaps. 

3. After you have downloaded gapps connect you phone to your computer and replace your old gapps with the gapps you just downloaded.

4. After you have downloaded gapps and the latest nightly of CyanogenMod click update on the CyanogenMod Nightly and it should take you to this screen:

Now this is where you may run into a problem. If, after the process is done and it reboots, you enter back into your custom recovery then you are going to want to do this.
This is most likely happening because your custom recovery is not up to date. To solve this problem all you need to do is download the latest version of your custom recovery and re-install it. I will show you how to do this for TWRP. 
You can download the latest version of TWRP here:
Click on "Get TWERP for your device" in the top right hand corner and select your device.
Now to get TWERP on your device before you should have downloaded some drivers for your phone, for me it was called "OneDrivers_fastboot". You are going to want to find this file and then open it. Inside you need a Fastboot file. If you are unsure how to do any of this then look up a guide on how to unlock your boot loader for you specific phone. Inside that Fastboot folder you need to replace the openrecovery TWERP image with the new one you just downloaded.
After you have that in there it should look something like this:
For this next part you are going to want to connect your device to your computer. So now you are going to want to copy and past the name of the .img file. Then hold "shift" and right click inside that window and then click "Open command window here". You should now have a command window open that looks like this:
(I have cropped out the first part as it had some personal stuff)
Now in the command prompt you are going to want to type "fastboot flash recovery" and then paste the name of the image (make sure you add .img to the end of the name if it is not already there). Now it should look like this:
Now press enter and let it run. It should be pretty quick.Now you need to type in one more thing into the command prompt, "fastboot erase cache". That should also be pretty quick.
After that is done the latest version of TWRP should be installed. Now all you need to do is go back into TWRP, go to Install and find the downloads section and click on the download of the Nightly. Let it run and afterwards it will re-boot, it should now work. After it is done re-booting you are going to need to go into TWRP again and flash gapps otherwise none of the google apps will work. Now you should have a completely working version of CM 11.

Sorry for the rubbish camera quality, I do not have a camera at the moment so I was having to use iPad 2 which is not ideal.

If you found this useful please share it and follow me on Twitter, https://twitter.com/TechRandN


Tuesday 24 December 2013

CyanogenMod 10.2 Review


Logo
Hello and welcome to my review of CyanogenMod 10.2. I have been using CyanogenMod now for about six weeks on my HTC One and have been impressed by some parts and not so impressed by others. In this review I will go through the different things that CyanogenMod changes and what people might expect to get out it. Bare in mind that some of the performance things that I write about will vary between phones.

I will start out with the battery. It is often said that one of the main reasons that people decide to unlock, root, and put custom ROMs on their device is to improve battery life. This is particularly true of CyanogenMod and it seems logical because it is removing all of the bloat ware that comes with companies like HTC and Samsung custom skins for Android. However, in my case while using an HTC One I have not noticed a dramatic increase in battery life, in fact it may have gotten worse. After doing some research I have found that this is because HTC has done a very good job of optimising Sense for battery life so a stock HTC One is about the best battery life you are going to get. The reason CyanogenMod is not as well optimised is because it uses a different kernel which is not as well optimised. However if you want a stock Android feel then you can go for the Google Edition ROM because this uses the same Sense kernel which is so well optimised, you will just not be able to get the same level of customisation you get with something like CyanogenMod. One of the main issues I had earlier on when using CyanogenMod was my battery draining really fast over night. I used to charge my phone before I went to bed and then take it off over night, however about three times a week the battery would drain drastically over night to about 40%. This was a big problem and the only solutions I could find were to charge my phone over night or to turn my phone off over night. I was reluctant to do the latter so now I charge my phone over night.

Another reason that a lot of people choose to use custom ROMs and particularly CyanogenMod is because it increases the speed of their phone. Once again this is because it gets rid of the pre-loaded bloat ware that comes with phone manufacturers custom Android skins. However because the HTC One is already such a speedy phone I saw no performance increase in terms of speeds. Start up times are usually decreased as well by installing CyanogenMod but the HTC One has one of the fastest boot times of a phone so the boot up time was probably decreased. This is not a problem for me as I rarely turn my off or restart it.

As some one who never really found Sense too obnoxious the transition from it to a stock Android was neither bad nor good. The CyanogenMod home screen appears very similar to stock Android at first glance but their custom launcher adds a few subtle differences. One of these being the ability to edit names of apps on your home screen. This is done by long clicking on your app so that you can drag it; now instead of the option to just remove there is also the option to edit it.

There are also a few extra CyanogenMod wallpapers that come when you first install it. There is also the theme chooser in the settings. This allows you download themes from apps like Theme Chooser or from the internet and then change the theme of your phone. I have not used this as I like the stock theme applied.

The biggest place you will see differences from stock Android or whatever Android skin you are using will be in the settings. This is where you will be able to do most of your customising. I will go through the headings they use one by one and show you what you can do in each one.
The first heading in settings is the Wireless and Networks heading. Most of the things you will find in here are things that you find standard on any other Android phone, however, there is one interesting thing in here. There is one extra option at the bottom which is "mobile broadcasts". This allows you to select which mobile broadcasts, in terms of emergencies, threats, and other things, that you want to receive.


The next heading you will find is Personalisation. This is where CyanogenMod, and other custom ROMs, really come into their own in my opinion as this is where they really allow to customise your experience so you can have it just as you want it. The reason you are able to customise so much of this is because of their custom launcher Trebuchet. The first option under the personalisation header is the home screen and there are many things that you can change.

Most of the things that you can change on your home screen are actually useful such as being able to choose the number of screens you have on your home screen, which screen is your home screen, and the grid size but some of the options do feel kind of gimmicky such as having the option to choose between numerous transition effects. While this may seem gimmicky it also quite nice that you can customise your device this far.
After the home screen there are settings for the app drawer; the settings for this are fairly similar. I have found the most useful for me was being able to to change the way you scroll through app. Having come from Sense where you scroll vertically through your app drawer I found it difficult to adjust scrolling horizontally, however, it was easy enough to change it back to the way that I am use to.

Next up is the customisation for the dock. I was amazed at the level of customisation you can have for the dock on your home screen. I found the most useful to be the ability to have more than one page on your dock. I think that this could be very useful if you have more than four main apps that you want quick and easy access to.

Finally in the general section is the most useful change you can make, being able to rotate your home screen and your app drawer. This has long been a complaint for Android users and I have found it very annoying in the past not being able to rotate my home screen but I know can as CyanogenMod has given me the ability to do that.

All of that was just in the first sub section of personalisation. After that you come to the lock screen where you can customise many things.

There are quite a few options for customising your lock screen security, you even have the ability to the delay the lock screen and you also have the option to unlock your phone by pressing the home button. One of my favourite things about the lock screen coming from Sense is the slider short cuts. While Sense has a similar short cut implementation where you can drag items on your dock to unlock straight to that application, I feel that the slider short cuts is better as they do not have to be the same as the apps in your dock. I do have one problem with the slider short cuts though and that is that the default position for the unlock short cut is in the bottom right and I have not yet found a way to change the position of this. I would much rather it be at the top rather than at the side.
After the lock screen there is the themes section. I have already talked about this but this is where you go to change to any theme that you have downloaded. After the themes sub-heading there is the interface sub-heading where there are a few useful settings such as things to do with the status bar.

After Personalisation you will find the Device heading. In here you find many standard things you would expect to find on any phone such as where you change your ring tone and similar things.

The first thing you see in Device is sound. In here is everything you would expect to find apart from two interesting things. The first one of these is Quiet Hours. I am not sure if this is on stock Android but I find it very useful; it allows you to change the sounds of your phone for a certain period of time each day, most likely over night, so that your notifications do not disturb you.

The second is the music effects using DSP Manager. If you are using an HTC phone that supports Beats music then this is your replacement for it. It has much greater customisation allowing you to change various things to do with the audio.

There is not much that is interesting in the rest of sub-headings under Device apart from a few interesting things in the buttons sub-heading such as allowing custom buttons. Before updating CyanogenMod I could use the HTC logo on my HTC One as a button but since updating it seems that I have lost the ability to do that and I cannot find anywhere to change it so that I can. Everything else under device is fairly standard.

After Device you reach Personal where, once again most of the things are pretty standard. The most interesting thing about personal for is that they give you five standard profiles that you can then tinker with so that you can have five profiles that fit your needs perfectly depending on the situation. Nothing else in Personal is very noteworthy.


Then there is just accounts and system. Accounts is just the various different accounts you have on the phone, so you have g-mail accounts, other email accounts, your CyanogenMod account and your social network accounts.

There are a couple of interesting things in system such as accessibility. In here it allows you to change what a couple of buttons do in specific situations such as making the home button answer phone calls. Then there is Superuser which allows root management functionality while you are on the phone, which very few custom ROMs allow as far as I am aware. What it does is asks your permission when an app is trying to gain root access to your phone. This will be very useful for people who are doing this a lot. It then comes up with a list of apps that you have either granted or denied permission and you can then change the settings for each of these apps. You then have the About Phone section where it tells you what version of CyanogenMod you are running and it is where you can check for updates; however, this is unnecessary as it sends you a notification when an update is available. It also gives you various other pieces of information about your phone.

That is it for settings. I hope that helps you understand where to look for certain things and also helps you customise your phone to your liking.

 There are a few things which I do not like about CyanogenMod that I have not already said. One of these things is multitasking. I am aware that they are using what comes from the Android Open Source Project (AOSP) but I wish they had come up with their own. I am not a fan of the stock Android multitasking, I much prefer HTC's version of it where you can see the last nine apps that you have been running all on one page rather than scolling.
Another issue I have, and this from the AOSP as well, is that to get a widget you have to go into your app drawer and find the widget you want. Once again like in Sense I think you should be able to long touch on an empty space on your home screen and there should be an option to add a widget. The only options that are there at the moment are to do with the wallpaper.
My final complaint is to do with updating. The one time I have updated I had quite a large problem that none of my Google Apps would work. I soon worked out that I needed to update my g-apps but this is rather annoying to have to do every time I want to update. I have not looked into this greatly so I am unsure whether there is a fix for this or not.

So, overall I really do like CyanogenMod and the customisation that it offers, I am just a little disappointed that my battery life has not been improved (although this is not there fault really). Therefore if you looking at CyanogenMod for an HTC One with the aim of getting better battery life then I would not bother. However if you are looking for a custom ROM that offers loads of customisation while still looking like stock Android then it is a great option. Bare in mind that my views are coming from using CyanogenMod on an HTC One; the experience of CyanogenMod may differ from phone to phone.

If you do want to download it then head over here to get a download for your phone:
http://download.cyanogenmod.org/

If you enjoyed this review then make sure you share it on Twitter and Facebook and follow me on Twitter here:
https://twitter.com/TechRandN

Monday 23 December 2013

iOS 7 Jailbreak Guide

So a Jailbreak for iOS 7 was recently released and as stated in a previous blog I was interested in the Jailbreaking a while ago so I thought I would give you a guide in how to Jailbreak any device on iOS 7.

I just want to begin this guide by saying all credit goes to the guys at evasi0n for bringing this Jailbreak and I will not take any responsibility for any phone, iPod, or iPad that gets broken during this process, you do it at your own risk. This does void your warranty as well. This Jailbreak will work with any device that is running iOS 7 to iOS 7.0.4. This does not work with all devices but here is the list that it does work with:

  • iPhone 3GS, 4, 4S, 5, 5S, 5C
  • iPad 2, 3, 4, Mini, Air, Mini 2 with retina
  • iPod touch 5

This Jailbreak is very easy and so should be easily attainable by anyone.

Ok so now what you came here for the guide:

1) The first thing you are going to want to do is download the latest version of iTunes from the Apple website here, http://www.apple.com/lae/itunes/download/, as not having the latest version can cause issues. Then you are going to want back up your device to make sure that you do not lose any of data.

2) After you have done that you are going to want to download your evasi0n from here, make sure you select the right operating system, http://www.downloadevasion.org/download-evasion.html

3) After downloading it make sure you device is plugged in and you have no pass code on it, if you have one disable it and then re-enable it after you have Jailbroken it.

4) Locate the evasi0n download and open it up. It should acknowledge that your device is connected and the Jailbreak button will become available.

5) You can then press the Jailbreak button and let it do its thing. Do not touch your device unless it tells you to.

6) After it has finished you will need to go on your device and open the evasi0n app and you should be Jailbroken!


Be warned though. A lot of the apps in cydia are not ready for iOS 7 and downloading one of these apps could brick your device so make sure before downloading a app from Cydia you are 100% certain that you know that it works with iOS 7.

If this helped you or you enjoyed it make you share it and follow me on Twitter here, https://twitter.com/TechRandN, so that you know whenever I post a new blog.

I'm Back...

After only posting twice back in June and then just leaving it I am back, not that any one cares probably. I hope to post regularly here with at least one post a week bringing you the latest news in the tech world for that week. Other than that weekly blog I write about what I believe is big news and any new products I get I will review. Today though I just want to give you a brief insight into my background in technology.

My interest in technology really began when I got my iPod touch and I heard about Jailbreaking. After hearing about Jailbreaking I really wanted to get into it and so I began researching. After researching about it I managed to jailbreak my iPod touch and was very happy with the result. After that I carried on "modding", if you can call it that, my iPod and then my phone.
A little while after that I got my first desktop computer, unfortunately it was a pre-built system. My first upgrade for the machine was a Antec spot cooler as I was worried that my cpu was getting to hot. After opening up my computer for the first time I got the bug. I changed my case numerous times and have upgraded my computer so much over the last two years that now the only piece of hardware from that original pre-built system is my hard drive. My system now days is in a modded, by me, 800D with a full custom loop. The specs are i5 2500k clocked at 4.5gHz, MSI z77a gd-45, GTX 570, 8Gb Corsair Vengeance, OCZ 750W custom sleeving. So in the last two years I have gone from no computer building knowledge at all to building my own custom loop and modding my 800D.

So that is my background in computer hardware and how I got introduced into computer hardware. Now I mentioned Jailbreaking earlier in this post and after writing and posting this I will do a guide for Jailbreaking any device for ios 7. Now I realise at the moment that all of my posts will have been Apple device based but that will not continue, do not worry. At the moment I plan on doing a review of Cyanogenmod as I have now had it on my HTC One for a couple of weeks now.

If you enjoyed this please share it on Twitter and Facebook and follow me on Twitter here:
https://twitter.com/TechRandN